LATEX - Beamer - 知乎
系统地整理一下Beamer的笔记,之前的使用只是基于某个模板的临时使用,当前的目标是整理一个简洁的自用Beamer模板。 注意到Beamer虽然属于LaTeX的一部分,但是与标准的LaTeX文档有很多的不同,部分LaTeX宏包和命令可能无法在Beamer上呈现正常的效果,这也意味着Beamer的编译错误更难改正。
笔记主要参考latex-beamer.com的英文在线教程和若干博客。
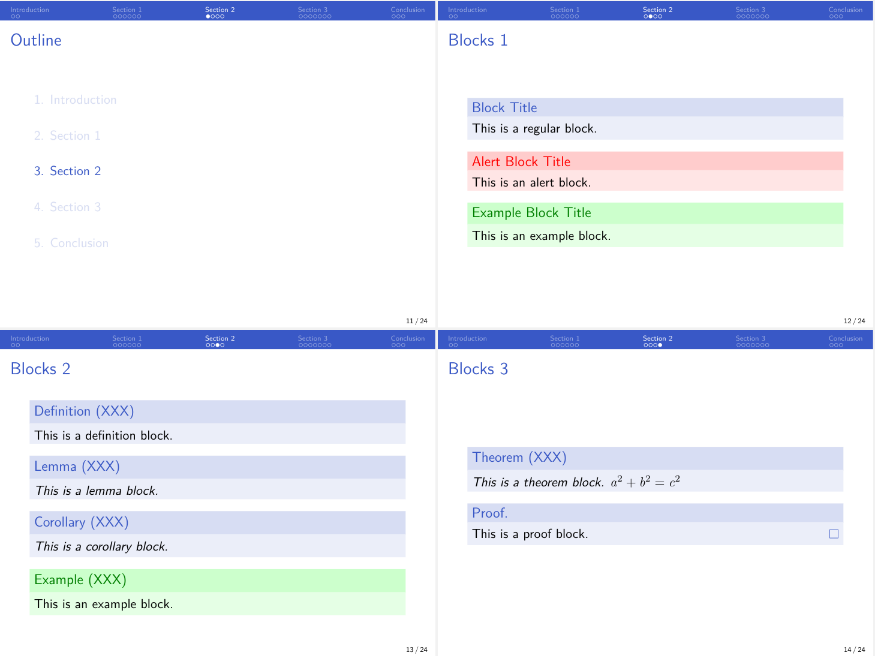
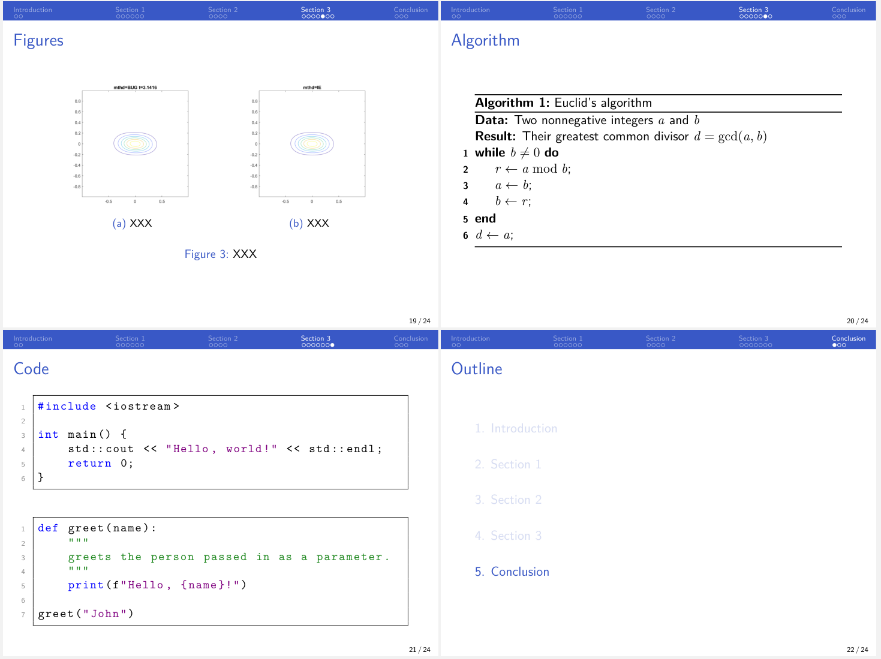
当前模板的效果如下图,模板对应的配置代码在本文最后。
极简示例
从一个最简单的例子开始
\documentclass{beamer}

% Theme choice:
\usetheme{AnnArbor}

% Title page details:
\title{My First \LaTeX{} Presentation}
\subtitle{A subtitle}
\author{Author}
\date{\today}

\begin{document}

% Title page frame
\begin{frame}[plain]
    \titlepage
\end{frame}

\begin{frame}
    Hello, world!
\end{frame}

\end{document}
在示例中使用了一个名为AnnArbor的Beamer主题,添加了作者和日期,并以此生成了标题页面。
标题页被包裹着frame环境中,frame环境是Beamer的核心环境,作用相当于PPT中的一页。 在frame外的内容可能会被LaTeX用奇怪的方法排版到幻灯片上,影响效果,因此尽可能将所有正文分别放在不同的frame中。
文档类选项
下面是几个常见的导入beamer文档类时指定的选项:
10pt: 指定正文的基本字体大小为10pt,Beamer支持的字号包括:8pt、9pt、10pt、11pt、12pt、14pt、17pt、20pt,默认为11pt。aspectratio=43: 指定演示文稿的纵横比,默认比例为4:3,即传统屏幕纵横比,还可以改为16:9的屏幕纵横比aspectratio=169;mathserif: 在数学模式中指定使用衬线字体,保持与article相同,而不是采用默认的无衬线字体;table: 加载与表格相关的宏包,以增强表格的功能;compress:压缩导航栏的排版,使导航栏上的这些信息更紧凑,例如从多行压缩为单行。notes:是Beamer支持演讲者视图,在每一页之后添加notes,但是问题是很多PDF浏览器在放映时不支持。
文档结构
Beamer使用\section{},\subsection{}(或\section*{}和\subsection*{})来划分结构, 注意:
- Beamer不支持
\chapter; - 与LaTeX标准文档不同,这些命令不会在对应位置显示章节标题;
- 必须在frame外部使用这些章节命令,否则可能有排版错误。
标题页
标题页的设置包括填写基本信息,以及在一个frame中使用\titlepage命令, 或者也可以直接使用通常的\maketitle命令,此时不用包裹在frame之中。(两者的效果大致等价,但是可能略有区别)
标题页会显示的基本元素包括:
\title{},主标题\subtitle{},子标题\author{},多个作者可以使用\and命令连接\date{},当前日期使用\date{\today}\institute{},机构
对于作者,可以使用~连接姓名确保姓和名不会被换行符分开
\author{First~Author \and
  Second~Author \and
  Third~Author}
如果多个作者分别属于不同的机构,可以参考下面的代码
\author{First~Author\inst{1} \and Second~Author\inst{2}}

\institute{\inst{1} Affiliation of the 1st author \and
 \inst{2} Affiliation of the 2nd author}
在某些模板中,作者和单位、演示文稿标题和日期等信息会默认显示在每一页底部的脚注中,有时信息过长无法显示,可以在添加信息时加入简称,例如
\title[<short one>]{<long title>}
\author[<short one>]{<authors names>}
\institute[<short one>]{authors affiliation}
也可以设置简称为空,从而取消脚注,例如\title[]{Presentation title}。
在演示文稿中添加徽标是一个很常见的需求,可以在导言区添加如下代码
\logo{
    \includegraphics[width=1cm]{ustc-logo.jpg}
}
徽章会出现在每一页的固定位置,默认位置由主题决定,可能出现在右下角,更改徽章位置可以使用tikz等宏包完成。
一个更常见的需求是只在标题页中呈现标志,可以改为
\titlegraphic{
    \includegraphics[width=2cm]{ustc-logo.jpg}
}
此时标志图片只会在标题页出现,默认位置通常为正中偏下的位置。
目录页
使用下面的命令可以创建目录页
\begin{frame}{Outline} % or Contents
    \tableofcontents
\end{frame}
可以使用\section*{References}将章节从目录中隐藏,可以添加如下选项在目录中隐藏所有的子章节
\tableofcontents[hideallsubsections]
可以使用下面的命令,在进入每一个章节前复现一次目录
\AtBeginSection[ ]
{
\begin{frame}{Outline}
    \tableofcontents[currentsection]
\end{frame}
}
默认情况下,Beamer可能不会给section和subsection编号,下面的代码可以开启编号
\setbeamertemplate{section in toc}[sections numbered]
\setbeamertemplate{subsection in toc}[subsections numbered]
一个更完整的参考配置如下
\AtBeginSection[]
{
\begin{frame}{Outline}
    \tableofcontents[currentsection,currentsubsection,
        hideothersubsections,
        sectionstyle=show/shaded
    ]
\end{frame}
}

\begin{frame}{Outline}
    \tableofcontents[sectionstyle=show,
        subsectionstyle=show/shaded/hide,
        subsubsectionstyle=show/shaded/hide
    ]
\end{frame}
解释一下这里的选项:在每一节之前高亮当前section和subsection,隐藏其它的subsection,最后设置了目录样式。
frame环境
frame的基本使用如下,可以设置主标题,副标题以及额外选项,它们都是可选的。
% Frame environment
\begin{frame}[options]{<Frame Title>}{<Frame subtitle>}
  content
\end{frame}
也可以使用单独命令添加主标题和副标题
\begin{frame}
    \frametitle{<Frame Title>}
    \framesubtitle{<Frame subtitle>}

    content
\end{frame}
frame环境还支持如下的用法,即使用\frame命令
\frame{
    \frametitle{<Frame Title>}
    \framesubtitle{<Frame subtitle>}

    content
}
frame的选项例如[t][c][b]指定文本在页面中竖直方向的对齐方式:向上,居中或向下,默认是竖直居中的,可以进行如下修改
\begin{frame}[b]
    content
\end{frame}
可以使用[plain]选项来移除当前frame的顶部和底部细节,通常用于标题页展示纯净的页面
\begin{frame}[plain]
    \titlepage
\end{frame}
参考文献列表需要[allowframebreaks]选项来允许多余内容自动排版到下一页。
columns环境
演示文稿的一个常见需求是:对单个页面进行竖向拆分得到左右两列,分别添加不同的文字或者图文进行对比,也可以用来并列两个图片, 这些需求都可以通过columns环境实现,在使用中需要为每一列指定宽度,通常取为\textwidth的一个比例长度,各列长度和不超过\textwidth。
有两种具体用法,第一种是直接使用\column{0.6\textwidth}命令,第二种是使用column环境
\begin{column}{0.49\textwidth}
...
\end{column}
例如按照6:4的比例拆分,分别排版不同的文字
\begin{frame}{Columns in beamer}
    \begin{columns}
    \column{0.6\textwidth}
        % \centering
        This is column one with 0.6 text width.
    \column{0.4\textwidth}
        % \centering
        This is column two with 0.4 text width.
    \end{columns}
\end{frame}
可选\centering保持在每一部分居中对齐。
或者一列排版文字,另一列放置图片
\begin{columns}
    \column{0.4\textwidth}
        This is an example of text and image in the same slide using columns environment.
    \column{0.6\textwidth}
        \begin{figure}
        \centering
        \includegraphics[width=\textwidth]{xxx.jpg}
        \caption{Neural Network with 5 neurons in the hidden layer. }
        \end{figure}
    \end{columns}
有时需要在左右两列中间添加分隔线,一种实现方法为划分成三列,中间列的宽度极小,并且只包含一条竖线。
\begin{columns}
    % Column 1
    \begin{column}{0.49\textwidth}

     \begin{itemize}
         \item Input layer: 2 neurons.
         \item Hidden layer: 5 neurons.
         \item Output layer: 2 neurons.
     \end{itemize}

    \end{column}
    % Column 2 (vertical line)
    \begin{column}{.02\textwidth}
        \rule{.1mm}{0.7\textheight} % 加一条竖线
    \end{column}

    % Column 3
    \begin{column}{0.49\textwidth}
        \includegraphics[width=\textwidth]{Neural-Network.jpg}
    \end{column}

\end{columns}
可以通过在列环境之后分别添加[T]、[b]或[c]选项进行顶部对齐、底部对齐和中心对齐,实现不同列的内容对齐,例如
\begin{columns}[T]

    % Column 1
    \begin{column}{0.5\textwidth}
     This is a neural network with two inputs and two outputs. It has the following parameters:
     \begin{itemize}
         \item Input layer: 2 neurons.
         \item Hidden layer: 5 neurons.
         \item Output layer: 2 neurons.
     \end{itemize}
     The neural network is drawn in \LaTeX{} using Ti\textit{k}Z package. Check latexdraw.com for more details.
    \end{column}

    % Column 2
    \begin{column}{0.5\textwidth}
        \includegraphics[width=\textwidth]{Neural-Network.jpg}
    \end{column}

\end{columns}
block/定理类环境
Beamer预定义了很多诸如定理和证明的定理类环境,还有一般的block环境,注意这些环境的默认表现与主题有关,例如默认主题Madrid呈现的效果非常具有数学风格。
基本使用
下面是常见的block环境和定理类环境:
- block环境
- 通用/标准 block
\begin{block}...\end{block} - 示例block exampleblock
\begin{exampleblock} ... \end{exampleblock} - 警告block alertblock
\begin{alertblock}...\end{alertblock}
- 定理类环境
- 定理 theorem
\begin{theorem} ... \end{theorem} - 定义 definition
\begin{definition} ... \end{definition} - 证明 proof
\begin{proof} ... \end{proof},默认含有证毕符号 - 引理 lemma
\begin{lemma} ... \end{lemma} - 推论 corollary
\begin{corollary} ... \end{corollary} - 示例 example
\begin{example} ... \end{example}
其中的定理类环境有默认标题,可以使用[]添加补充名称,例如下面的代码会显示块标题为:Example (Demo)
\begin{example}[Demo]
    content
\end{example}
block环境必须添加一个标题,否则会自动将内容的第一个字母提升为标题。block环境使用{}定义标题,例如下面的代码会显示块标题为:Demo
\begin{exampleblock}{Demo}
    content
\end{exampleblock}
下面考虑修改各种block环境和定理类环境的样式和颜色。
样式修改
我们可以通过使用命令来修改块的形状:\setbeamertemplate{blocks}[Options],这会影响上面所有的block环境样式。
常见预定义选项有:
[rounded]:使矩形变成圆角矩形[shadow=true]:如果阴影设置为 true,则在块后面描绘阴影。
例如在导言区添加
\setbeamertemplate{blocks}[rounded][shadow=true]
颜色修改
block环境的颜色默认取决于主题,但是我们同样可以在不改变主题的基础上,改变block的颜色细节,并且可以具体到每一种block环境。
对每一种block环境,可以调整的颜色细节包括:
- title的背景色
- title的前景色
- body的背景色
- body的前景色
例如
% 1- block title (background and text)
\setbeamercolor{block title example}{fg=white, bg=teal}

% 2- block body (background and text)
\setbeamercolor{block body example}{bg=teal!25}

% Change alert block colors
% 1- block title (background and text)
\setbeamercolor{block title alerted}{fg=white, bg=orange}
% 2- block body (background and text)
\setbeamercolor{block body alerted}{bg=orange!25}

% Change standard block colors
% 1- block title (background and text)
\setbeamercolor{block title}{bg=cyan, fg=white}
% 2- block body (background)
\setbeamercolor{block body}{bg=cyan!10}
再例如
\setbeamercolor{block body}{bg=structure!10}
\setbeamercolor{block title}{bg=structure!20}

\setbeamercolor{block body alerted}{bg=alerted text.fg!10}
\setbeamercolor{block title alerted}{bg=alerted text.fg!20}

\setbeamercolor{block body example}{bg=green!10}
\setbeamercolor{block title example}{bg=green!20}
注意:
- 这里
!20等代表在基础颜色的基础上进行颜色的深度调整,即RGB数值的百分比衰减,得到更淡的颜色; - Beamer不直接支持对定理类环境的各个具体环境分别设置样式,当然这可以通过更底层的命令实现。
列表环境
相比于大段文字的堆砌,演示文稿中更推荐的是呈现关键信息的列表。 Beamer直接支持LaTeX的有序列表,无序列表和描述列表,并且支持嵌套和列表配置的宏包等,例如
\begin{frame}{Nested Lists in Beamer}
\begin{enumerate}
    \item One
    \begin{itemize}
        \item Sub-category
        \item Sub-category
        \item Sub-category
    \end{itemize}
    \item Two
    \item Three
    \begin{description}
    \item[A] apple able
    \item[B] ban banana
\end{description}
\end{enumerate}
\end{frame}
对于演示文稿中的列表,有下面几种常见问题以及对应的处理。
列表过长可能需要分页展示,此时需要考虑的是列表计数器的设置,例如
% Define a counter
\newcounter{currentenumi}

\begin{frame}{Lists in multiple frames}{Frame 1}
\begin{enumerate}
    \item Item 1
    \item Item 2
    \item Item 3
    % Store the actual item number
    \setcounter{currentenumi}{\theenumi}
\end{enumerate}
\end{frame}

\begin{frame}{Lists in multiple frames}{Frame 2}
\begin{enumerate}
    % Use the previous stored item number
    \setcounter{enumi}{\thecurrentenumi}
    \item Item 4
    \item Item 5
\end{enumerate}
\end{frame}
这里的配置包括三部分:
- 在导言区定义了计数器;
- 前一页的列表最后设置了计数器的值;
- 在后一页的列表中使用了计数器的值。
有时列表的每一项之间的行间距过小,但是只有两三个项,导致排版非常不美观,可以用下面的\vspace{}语句直接修改局部的行间距,不影响其它文本的行间距
\begin{frame}{Add space between items}
\begin{itemize}
    \item Item one
    \vspace{0.5cm}
    \item Item two
    \vspace{1cm}
    \item Item three
\end{itemize}
\end{frame}
可以使用
\linespread{xxx}改变全局的行间距的倍数
默认主题的列表序号样式很丑,可以改成简单的数字或罗马字母等,配置与LaTeX一样,需要enumitem宏包支持(这个宏包的导入会破坏前面的计数器,原因不明)
\usepackage{enumitem}

\begin{frame}
    \begin{enumerate}[label={\alph*)}]
        \item Alphabet one
        \item Alphabet two
    \end{enumerate}
    \begin{enumerate}[label={\roman*.}]
        \item Roman number one
        \item Roman number two
    \end{enumerate}
    \begin{enumerate}[label={(\arabic*)}]
        \item Arabic number one
        \item Arabic number two
    \end{enumerate}
\end{frame}
Beamer本身也提供了关于列表的样式修改命令,例如
内部排版
记录一下关于页面内部排版的几个细节需求。
默认的分段在演示文稿中是不明显的,我们可以在段尾添加\\~\\产生更明显的分段效果,实质上是加了一个空行,例如
\begin{frame}
    Hello, world! 1.
    Hello, world! 2. \\~\\

    Hello, world! 3.

    Hello, world! 4.

\end{frame}
此时会在12和3之间产生明显的宽度为一个空行的分段效果。
虽然LaTeX本身提供了粗体斜体等排版命令,但是Beamer可以通过一个ulem宏包达到更丰富的效果(除了数学公式中,那里仍然需要bm宏包)。 示例如下
\usepackage{ulem}

\begin{frame}{Text decorations provided by the
\texttt{ulem} package}

\uline{Underlined that breaks at the end of lines if
they are too too long because the author won’t stop
writing.} \\~\\

\uuline{Double-Underlined text} \\~\\

\uwave{Wavy-Underlined text} \\~\\

\sout{Strikethrough text} \\~\\

\xout{Struck with Hatching text} \\~\\

\dashuline{Dashed Underline text} \\~\\

\dotuline{Dotted Underline text}

\end{frame}
各个效果的解释如下:
\uline{}:下划线\uuline{}:双层下划线\uwave{}:波浪下划线\dashuline{}:下划虚线\dotuline{}:点下划线\sout{}:删除横线\xout{}:删除斜线
改变颜色仍然可以使用xcolor宏包,Beamer默认已经导入这个宏包,因此可以直接使用,例如
{\color{blue} This is a blue block.}
{\color{red} And this is a red one.}
参考文献
Beamer对于参考文献的使用与LaTeX文档有所不同:
- 不建议使用编号;
- 不建议在最后使用单独的参考文献列表;
- 建议在frame的脚注中立刻显示引用的参考文献条目。
例如
\usepackage[style=authoryear]{biblatex}
\addbibresource{reference.bib}

\begin{frame}{Reference}

    XXX \footfullcite{xxx}.

\end{frame}
注意:
setspace这个调整间距的宏包可能导致脚注无法显示,在使用参考文献脚注时建议移除这个宏包;\printbibliography这个命令可能会自动新建一个章节,并且在目录和导航栏中显示,非常奇怪,干脆不使用参考文献列表。
动态效果
在汇报用的演示文稿中加入花哨的动态效果是极其不推荐的,但是Beamer仍然支持一些简单的效果,就像PowerPoint一样,这里简单了解一下。 在很多Beamer环境中,允许使用
<...>添加与动态效果相关的参数,这里全部略去。
下面的例子使用\pause暂停命令,这意味着演讲者需要手动确认一次才会继续展示列表的下一项,直至完全呈现。
\begin{frame}{Creating Overlays in Beamer}{Pause command}
\begin{itemize}
    \item Shown from the first slide on.
\pause
    \item Shown from the second slide on.
\pause
    \item Shown from the third slide on.
\end{itemize}
\end{frame}
\pause也可以使用在段落中。更常见的是下面这种做法,可以精确调控每一帧显示哪些项
\begin{frame}
\frametitle{Sample frame title}
This is a text in second frame.
For the sake of showing an example.

\begin{itemize}
    \item<1-> Text visible on slide 1,2,3,4
    \item<2-> Text visible on slide 2,3,4
    \item<3> Text visible on slide 3
    \item<4-> Text visible on slide 4
\end{itemize}
\end{frame}
主题
整体主题
通常在导言区的第二行立刻声明使用的整体主题,例如
\documentclass{beamer}
\usetheme{default}
Beamer内置了27个整体主题,可以按照导航栏进行简单分类:
- 无导航栏:default、boxes、Bergen、Pittsburgh、Rochester
- 带顶部导航栏:Antibes、Darmstadt、Frankfurt、JuanLesPins、Montpellier、Singapore
- 带底部导航栏:Boadilla、Madrid
- 带顶部和底部导航栏:AnnArbor、Berlin、CambridgeUS、Copenhagen、Dresden、Ilmenau、Luebeck、Malmoe、Szeged、Warsaw
- 带侧边栏:Berkeley、Goettingen、Hannover、Marburg、PaloAlto
一个整体主题实际上主要是下面四种细分主题的组合搭配(加上一些细节调整),例如default主题实质为
\usefonttheme{default}
\usecolortheme{default}
\useinnertheme{default}
\useoutertheme{default}
而Boadilla主题实质为
\usecolortheme{rose}
\useinnertheme[shadow]{rounded}
\usecolortheme{dolphin}
\useoutertheme{infolines}
如果需要定制整体主题,基于default进行修改是一个非常好的选择。
细分主题
Beamer将主题拆分为了下面四个部分:
- 字体主题,
\usefonttheme{} - 颜色主题,
\usecolortheme{} - 内部主题,
\useinnertheme{} - 外部主题,
\useoutertheme{}
Beamer字体主题支持全局地设置字体风格,\usefonttheme{}命令支持如下选项:
- default:(默认)各种标题和文本字体均为无衬线的等线体,数学式中的字体为等斜线体。为标题、标题和页脚等元素使用不同的字体大小,但不使用粗体或斜体进行突出显示。
- serif:使所有文本都使用默认衬线字体(直立罗马体)进行排版。
- structurebold:通常的文本是无衬线字体,但是标题、脚线和各种导航条中的标题和文本变更为粗体。
- structureitalicserif:与 structurebold 类似,但是标题、脚线和各种导航条中的标题和文本变更为斜罗马体。
- structuresmallcapsserif:与 structurebold 类似,但是标题、脚线和各种导航条中的标题和文本变更为小型大写字体。
- professionalfonts:(专业字体选项)这个选项抑制了Beamer对字体的自动修改,将其留给其它宏包进行处理。
值得注意的是,与article等文档不同,beamer考虑到投影后的辨识度, 默认全局采用了无衬线字体,这看起来有些奇怪,尤其是在数学公式中的符号。如果需要在数学公式中改成衬线体,可使用
\usefonttheme[onlymath]{serif}命令。
颜色主题设定演示文稿的各部分各结构各元素的配色,\usecolortheme{}命令支持如下选项:
- 基本颜色:default、sidebartab、structure;
- 完整颜色:albatross(信天翁)、beaver(海狸)、beetle(甲壳虫)、crane(鹤)、dove(鸽子)、fly(苍蝇)、seagull(海鸥)、wolverine(狼獾);
- 内部颜色:lily(百合)、orchid(兰花)、rose(玫瑰);
- 外部颜色:dolphin(海豚)、seahorse(海马)、whale(鲸鱼)。
外部主题设定演示文稿是否有顶栏、底栏和侧栏,以及它们的结构,\useoutertheme{}命令支持如下选项:
- default
- infolines
- miniframes
- sidebar
- smoothbars
- split
- shadow
- tree
- smoothtree
主要是导航条的位置和样式细节,建议采用miniframes,加上subsection=false选项取消在顶边导航条中显示当前小节标题
\useoutertheme[subsection=false]{miniframes}
内部主题设定演示文稿正文内容(例如标题、列表、定理等)的样式,\useinnertheme{}命令支持如下选项:
- default:默认值,其定义了论文题名、作者姓名、各种列表、插图以及表格标题、各种模块、摘要、脚注以及参考文献等文本元素的样式;
- circles:将itemize item中的小三角改为小圆盘,排序列表enumerate items添加背景小圆盘,目录中每个条目前加一个小圆盘;
- rectangle:将itemize item中的小三角改为小方块,排序列表enumerate items添加背景小方块,目录中每个条目前加一个小方块;
- rounded:将itemize item中的小三角改为小圆,排序列表enumerate items添加背景小圆,目录中每个条目前加一个小圆,题名和各种模块的背景框由直角变更为圆弧,其有下列参数:shadow 给各种木块添加阴影,以满足立体感。
定制主题
Beamer各部分的样式都可以自己定制和修改,并且不需要使用LaTeX较低层的命令,Beamer已经提供了丰富的定制命令接口。 通常从下面几个角度来定制自己的主题:
- 选择基础主题,
\usetheme{},\usefonttheme{},\usecolortheme{},\useoutertheme{},\useinnertheme{} - 定制模板,
\setbeamertemplate{} - 定制颜色,
\setbeamercolor{} - 定制字体,
\setbeamerfont{}
例如选择下面的基础主题
\usetheme{default}
\usecolortheme{default}

% 应用一个外部主题,选项表示不显示subsection层面的导航信息
\useoutertheme[subsection=false]{miniframes}
下面是一些涉及定制样式的常见代码。
标题页样式
代码和作用如下
% Beamer用于定义标题页样式的模板命令。
% [default]: 表示使用默认的标题页样式作为基础。
% [colsep=-4bp]: 设置列之间的间距为 -4bp(负值表示列之间的重叠)。
% [rounded=true]: 启用标题页元素的圆角效果。
% [shadow=true]: 启用标题页元素的阴影效果。
\setbeamertemplate{title page}[default][colsep=-4bp,rounded=true,shadow=true]

% 设置标题的颜色,背景为structure颜色,文本为白色
\setbeamercolor*{title}{use=structure,fg=white,bg=structure.fg}
head/foot样式
代码和作用如下
% 设置head/foot的颜色,背景为structure颜色,文本为白色
\setbeamercolor{section in head/foot}{fg=white, bg=structure}
修改证明环境
proof环境的提示词为Proof,有时希望修改为中文,可以使用下面的代码
\renewcommand{\proofname}{证明}
在proof环境中默认以空心方框表示证明结束,可以用下面的代码删除或修改证毕符号
% 删除
\def\qedsymbol{}

% 修改为实心矩形
\setbeamertemplate{qed symbol}{$\blacksquare$}
删除导航按钮
beamer默认在每一个页面的最底层添加了一行可以跳转到不同页面的按钮,但是通常没人会使用这些,可以用下面的代码禁用它们,使页面显得更加干净
\setbeamertemplate{navigation symbols}{}
底栏显示页码
使用下面的配置可以在底栏(底部导航栏的下面)的右下角显示页码,例如11/22
\setbeamertemplate{footline}[frame number]{}
优化列表样式
默认的无序列表和有序列表的样式可能很丑,例如无序列表一级默认是三角形,可以使用下面的代码修改
% 设置无序列表的样式,小圆点
\setbeamertemplate{itemize items}[circle]
% 设置有序列表的样式,默认数字
\setbeamertemplate{enumerate items}[default]
开启图表编号
默认Beamer不会给图表编号,下面的代码可以开启
\setbeamertemplate{caption}[numbered]
修改字体大小
默认情况下\institute{}的字体很小,在机构名称很长时看不清,下面的代码可以调整为正常大小
\setbeamerfont{institute}{size=\normalsize}
下面是对脚注字体大小的设置
\setbeamerfont{footnote}{size=\tiny}
Beamer常用宏包
Beamer常用宏包如下,设置正文字体(英文)为palatino,其它宏包提供对数学,图表,链接,还有算法和代码环境的基础支持。
% fonts
\usepackage[T1]{fontenc}
\usepackage{palatino}
\usepackage{mathrsfs}
\usepackage{calligra}
\usepackage{bm}

% math
\usepackage{amsmath,amsthm,amsfonts,amssymb}

\usepackage{extarrows}
\usepackage{booktabs}
\usepackage{multirow}
\usepackage{multicol}

\usepackage{hyperref}
\hypersetup{
    colorlinks=true,
    linkcolor=,
    filecolor=blue,
    urlcolor=blue,
    citecolor=cyan,
}

\usepackage{graphicx}
\graphicspath{
    {./figure/}{./figures/}{./image/}{./images/}{./graphic/}{./graphics/}{./picture/}{./pictures/}
}
\usepackage{subcaption}

\usepackage[ruled,noline]{algorithm2e}

\usepackage{listings}
\lstdefinestyle{mystyle}{
    basicstyle=\small\ttfamily,
    commentstyle=\color[RGB]{34,139,34},
    keywordstyle=\color[RGB]{0,0,255},
    numberstyle=\tiny\color{gray},
    stringstyle=\color[RGB]{128,0,128},
    identifierstyle=\color{black},
    showstringspaces=false,
    tabsize=4,
    breaklines=true,
    numbers=left,
    frame=single,
    rulecolor=\color{black},
    captionpos=b,
    xleftmargin=\parindent,
    aboveskip=\baselineskip,
    belowskip=\baselineskip,
    escapeinside={\%*}{*)},
}
\lstset{style=mystyle}

\usepackage[style=authoryear]{biblatex}
% \addbibresource{reference.bib}
补充
中文支持
对于beamer的中文支持,有两种选择:第一种是直接使用ctexbeamer,第二种是导入ctex宏包。
\documentclass{beamer}
\usepacakge[UTF8]{ctex}

...
这些与普通的LaTeX文档没有区别,因此不作详细讨论。如果对中文字体有要求,对应的字体设置命令也和普通LaTeX文档一致。
手稿模式
Beamer提供了handout模式用于呈现不同的演示文稿版本。
第一个作用是在PDF中只呈现页面的最终效果,以含有动态效果的一个页面为例,默认PDF会将动态效果变化过程的每一帧呈现出来, 但是加入handout选项只会呈现最终结果的页面,这使得生成的PDF适合阅读而非放映。
第二个作用是我们可以在某些frame中标记<handout:0>,则handout模式下不会显示。
\documentclass[handout]{beamer}

...

\begin{frame}<handout:0>
  This frame will be ignored in handout.
\end{frame}
这个标记在非handout模式下无效,frame会正常显示。
打印讲稿
我们可能需要在A4纸中提前打印讲稿的内容,并且为了节约纸张,需要将多张幻灯片排布在单面A4纸中,可以使用pgfpages宏包以及下面的配置
\usepackage{pgfpages}

\pgfpagesuselayout{2 on 1}[a4paper,border shrink=5mm]
% or
\pgfpagesuselayout{2 on 1}[a4paper,border shrink=5mm, landscape]
% or
\pgfpagesuselayout{4 on 1}[a4paper,border shrink=5mm, landscape]
这里2 on 1代表一面有两个幻灯片,4 on 1代表一面有四个幻灯片,landscape代表横向排列。
block中嵌入表格
一个可能的需求是如何在block环境中嵌入表格,与通常的table环境包裹tabular环境不同,在block中应该直接使用tabular环境。
\begin{frame}{Tables in Beamer Blocks}

\begin{alertblock}{Table inside an alert block}
A very important table.
\centering
\begin{tabular}{|c|c|}
\hline
    \multicolumn{2}{|c|}{Meals} \\ \hline
    Breakfast & Spam \\ \cline{2-2}
    & Eggs \\ \hline
\end{tabular}
\end{alertblock}

\end{frame}
使用算法环境
如果需要在frame中加入算法,例如使用algorithm2e宏包,必须在算法环境中加上H选项否则会编译报错。
\begin{frame}
    \begin{algorithm}[H]
        \caption{Title}
        \SetKwInput{KwPara}{Parameters}

        \KwIn{a,b,c}
        \KwOut{d,e,f}
        \KwPara{g,h}

        <Step 1>\;
        <Step 2>\;
        <Step 3>
    \end{algorithm}
\end{frame}
使用抄录环境
在Beamer的frame中使用\verb命令可能需要给frame加上额外的选项,否则会编译错误。
\begin{frame}[fragile]
    Demo: \verb!\frame{hellobeamer}!。
\end{frame}
这个选项将导致Beamer将该frame环境的全部内容先写在一个名为filename.vrb的临时文件里再处理。
对于
listings宏包的使用,也需要对frame加上[fragile]选项。
模板
直接将下面的片段粘贴到beamer的tex文件的导言区即可,在documentclass命令之后。
\usetheme{default}
\usecolortheme{default}
\useoutertheme[subsection=false]{miniframes}
\usefonttheme[onlymath]{serif}

\definecolor{simplebeamercolor}{RGB}{57,89,199}
\setbeamercolor{structure}{fg=simplebeamercolor} % default color: rgb{0.2 0.2 0.7}

\setbeamertemplate{footline}[frame number]{}
\setbeamertemplate{navigation symbols}{}

\setbeamercolor{section in head/foot}{fg=white, bg=structure}

\setbeamertemplate{title page}[default][colsep=-4bp,rounded=true,shadow=true]
\setbeamercolor*{title}{use=structure,fg=white,bg=structure.fg}

\setbeamertemplate{section in toc}[sections numbered]
\setbeamertemplate{subsection in toc}[subsections numbered]

\setbeamerfont{institute}{size=\normalsize}
\setbeamerfont{footnote}{size=\tiny}

\setbeamercolor{block body}{bg=structure!10}
\setbeamercolor{block title}{bg=structure!20}
\setbeamercolor{block body alerted}{bg=alerted text.fg!10}
\setbeamercolor{block title alerted}{bg=alerted text.fg!20}
\setbeamercolor{block body example}{bg=green!10}
\setbeamercolor{block title example}{bg=green!20}
\setbeamercolor{block title proof}{bg=white}
\setbeamercolor{block body proof}{bg=white}

\setbeamertemplate{itemize items}[circle]
\setbeamertemplate{enumerate items}[default]

\setbeamertemplate{caption}[numbered]

\AtBeginSection[]
{
    \begin{frame}<beamer>{Outline}
        \tableofcontents[currentsection,currentsubsection,
            hideothersubsections,sectionstyle=show/shaded]
    \end{frame}
}

% fonts
\usepackage[T1]{fontenc}
% \usepackage{palatino}
\usepackage{mathrsfs}
\usepackage{calligra}
\usepackage{bm}

% math
\usepackage{amsmath,amsthm,amsfonts,amssymb}

\usepackage{extarrows}
\usepackage{booktabs}
\usepackage{multirow}
\usepackage{multicol}
\usepackage{subcaption}

\usepackage{hyperref}
\hypersetup{
    colorlinks=true,
    linkcolor=,
    filecolor=blue,
    urlcolor=blue,
    citecolor=cyan,
}

\usepackage{graphicx}
\graphicspath{
    {./figure/}{./figures/}{./image/}{./images/}{./graphic/}{./graphics/}{./picture/}{./pictures/}
}

\usepackage[ruled,linesnumbered,noline]{algorithm2e}

\usepackage{listings}
\lstdefinestyle{mystyle}{
    basicstyle=\small\ttfamily,
    commentstyle=\color[RGB]{34,139,34},
    keywordstyle=\color[RGB]{0,0,255},
    numberstyle=\tiny\color{gray},
    stringstyle=\color[RGB]{128,0,128},
    identifierstyle=\color{black},
    showstringspaces=false,
    tabsize=4,
    breaklines=true,
    numbers=left,
    frame=single,
    rulecolor=\color{black},
    captionpos=b,
    xleftmargin=\parindent,
    aboveskip=\baselineskip,
    belowskip=\baselineskip,
    escapeinside={\%*}{*)},
}
\lstset{style=mystyle}
这部分主要参考下面这篇的模板内容
Lukan:一个简约的Beamer模板zhuanlan.zhihu.com/p/441466352?utm_psn=1750611827892019200